Kill Your IDE
I think the current system of IDEs is broken and caught in a cycle of tools that don’t compose with each other and have an endless litany of plugins that depend on others to update with APIs that break.
For instance, to use Atom’s Prettier plugin I need to path a global instance of Prettier or need it installed in my project and the errors in the linting UI are really dramatic without it. Then, I need to run and install something in the terminal and jump back into the editor.
Well, I’m in the terminal running yarn to add things and run my build server or running a test runner. Why would I want to jump into another application, another window to make a commit to Git only jump into another application to edit my code and then validate my changes in a browser? That’s a lot of churn to be attempt being productive.
So if you’re in the terminal already, why not keep the things you need within reach and available on demand?
Now, I know using vim is one of those loaded statements. But using that in the terminal alongside a build server or test runner and spare terminal for Git and running other commands felt like the simplest toolset.
But using just the defaults of Git or basic terminal commands aren’t quite “one-size-fits-all”; they need to be tapered to your needs and your sensibilities. There’s a better way here and I’m going to walk through some command line tools that have helped me break this cycle of churning through applications.
Note about Terminal Basics
I’m going to work under the presumption that most people reading this have some basic usage of the command line and understand a little bit about Git. But in case this is all new, here’s a little glossary of commands you can run in the terminal (that most likely come installed on your system):
cd— change directory, lets you move to a folder (or directory) in relation to your current directorymv— move, lets you move files and folders into another directorytouch— create filesmkdir— make directory, create foldersrm— remove files and folders from the systempwd— present working directory, prints the current directory you’re inls— list the contents of a directory.
These commands are primitive and help you do things really granularly. The more time you spend in the terminal the more commands you’ll want to take advantage of less fine-grained movements.
Navigating & Searching
z: changing your directory can be a really laborious process and typing cd ../some/path is bonkers. z is a directory jumper that let’s you fuzzy find directories, for instance:
$ z dot
# => ~/.dotfiles
z is pretty smart about remembering directories you’re normally in and after a few days of using cd after you’ve installed z you rarely have to use cd to move around directories in a fine-grained manner. Before I set up all these common aliases to project directories in my dotfiles and they were hard to maintain and useless if that project wasn’t on my system. Having a directory jumper to just fuzzy find the projects I was most commonly in was so helpful. To install this run brew install z and read the output because you do have to add something to your .zshrc or .bash_profile to source it correctly.
ag: like ack and ripgrep is a search tool that lets you search through the contents of a file and find all the instances of your query. The thing to like about it is that it can ignore directories pretty easily via a global .ignore file, meaning i can tell it to ignore every node_modules directory on my system while still finding something. brew install the_silver_searcher
fzf: fzf is a fuzzy file searcher. It’s very fast and it’s forgiving with the fuzziness of a query. I want to talk about this in another post more related to vim, but the vim integration for fzf flipped the tables for me; finding files and moving through buffers and using ag within vim make it way faster than something like Atom or VSCode.
You can wrap commands in fzf. For instance if you want to remap z to use fzf:
unalias z 2> /dev/null
z() {
  [ $# -gt 0 ] && _z "$*" && return
  cd "$(_z -l 2>&1 | fzf --height 40% --nth 2.. --reverse --inline-info +s --tac --query "${*##-* }" | sed 's/^[0-9,.]* *//')"
}
There are lot more examples here.
You can pipe the output commands into fzf. There’s an example further down in the post.
find * -type f | fzf > selected
git branch -l | fzf
Both ag and fzf are best paired together and you get so much utility within vim that makes your workflow nimble but especially powerful. This whole topic deserves its own post to dissect the benefits within vim and how it improves your workflow (which I might write soon). brew install fzf
tree: using ls to list out the contents of a directory is great and everything, but it doesn’t show the nested directory contents. However, that’s what tree was designed to does. You can install this with Homebrew: brew install tree
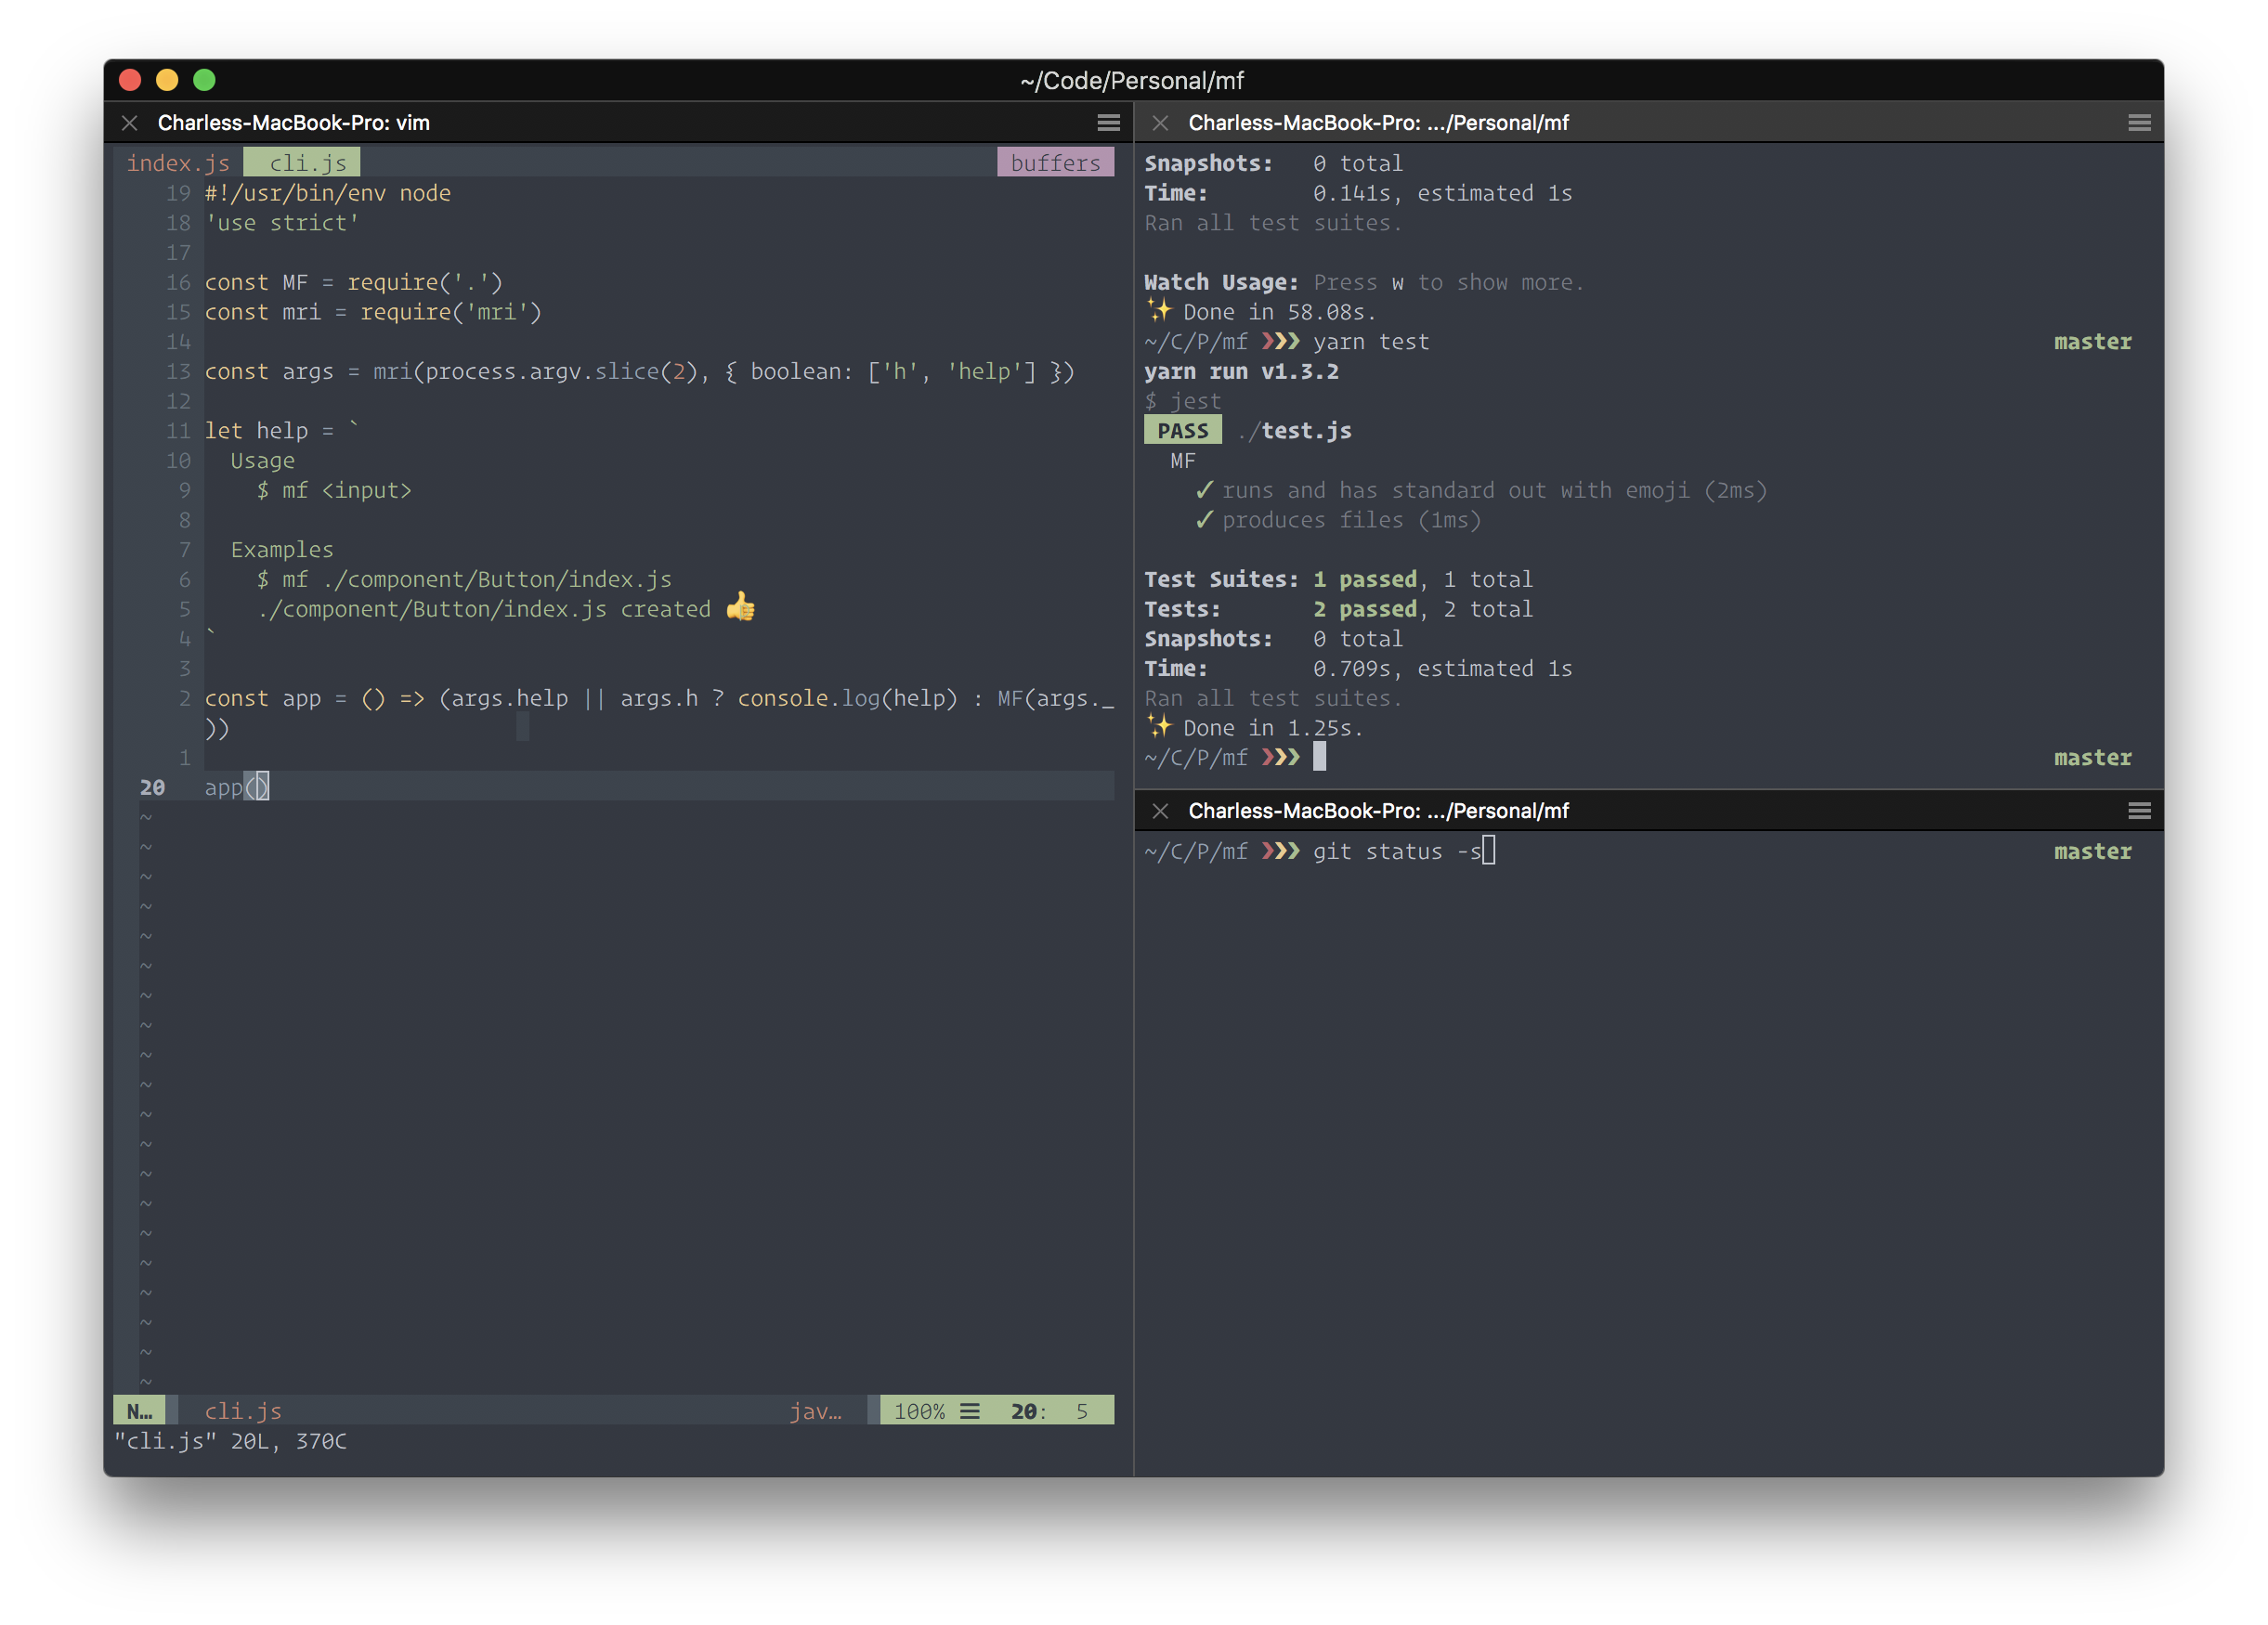
mf: one thing I loved about Atom is that when you used New File, you could put in a directory that didn’t exist and it would create the directory and the file at the same time with no warning. When I jumped around in the terminal more, I found that hard to do inside vim; vim-eunuch from Tim Pope helped quite a bit but it was missing from the command line itself. If I use touch component/index.js and the component directory doesn’t exist I’ll get an error. To resolve that I’d have to mkdir component from the command line and rerun touch component/index.js, which is tedious and something I could not get into the habit of, so I made mf. mf is like a simple super powered touch, it lets you create files and directories at the same time:
mf newfile.js test/script.js

newfile.js created 👍
test/script.js created 👍
There are things I’d like to change about it, like its binary size; I used a boilerplate Node project to get started with it and never fixed it, I’d like to add some better messaging. But having an emoji response is just one of those nice touches to an otherwise tedious task. This one you need to install with yarn or npm: yarn global add mf-cli
ccat is a neat colorizing of cat to support syntax highlighting in the output. It’s recommend that you should re-alias cat to it: alias cat=ccat, in your .zshrc or .bashrc. If you ever need to run cat without the highlighting or want to temporarily disable it prefix it with a slash \cat this will disable the alias of cat to ccat and run the command normally. You can install this with Homebrew: brew install ccat
As a side note to almost all of these tools, it’s a good idea to make them ignore right away things like node_modules and commonly ignored patterns like a dist directory or a log file. Even better, go a step further and get these navigation tools to to honor your .gitignore. From my experience there’s rarely a need to go dig into those files and they just add clutter. If you really need to get in there and find something, jumping into the directory you’re ignoring or directly specifying the file should do the job.
Git
Let’s see if we can’t make the git command-line experience better.
tig: one thing I miss about GUI git tools is being able to easily select individual files and chunks for staging before I commit. Tig is a git wrapper that lets you see at a glance: a neat log & an interface for seeing diffs and staging files for commit. To jump into that diffing interface run tig status. You can install this with Homebrew: brew install tig.
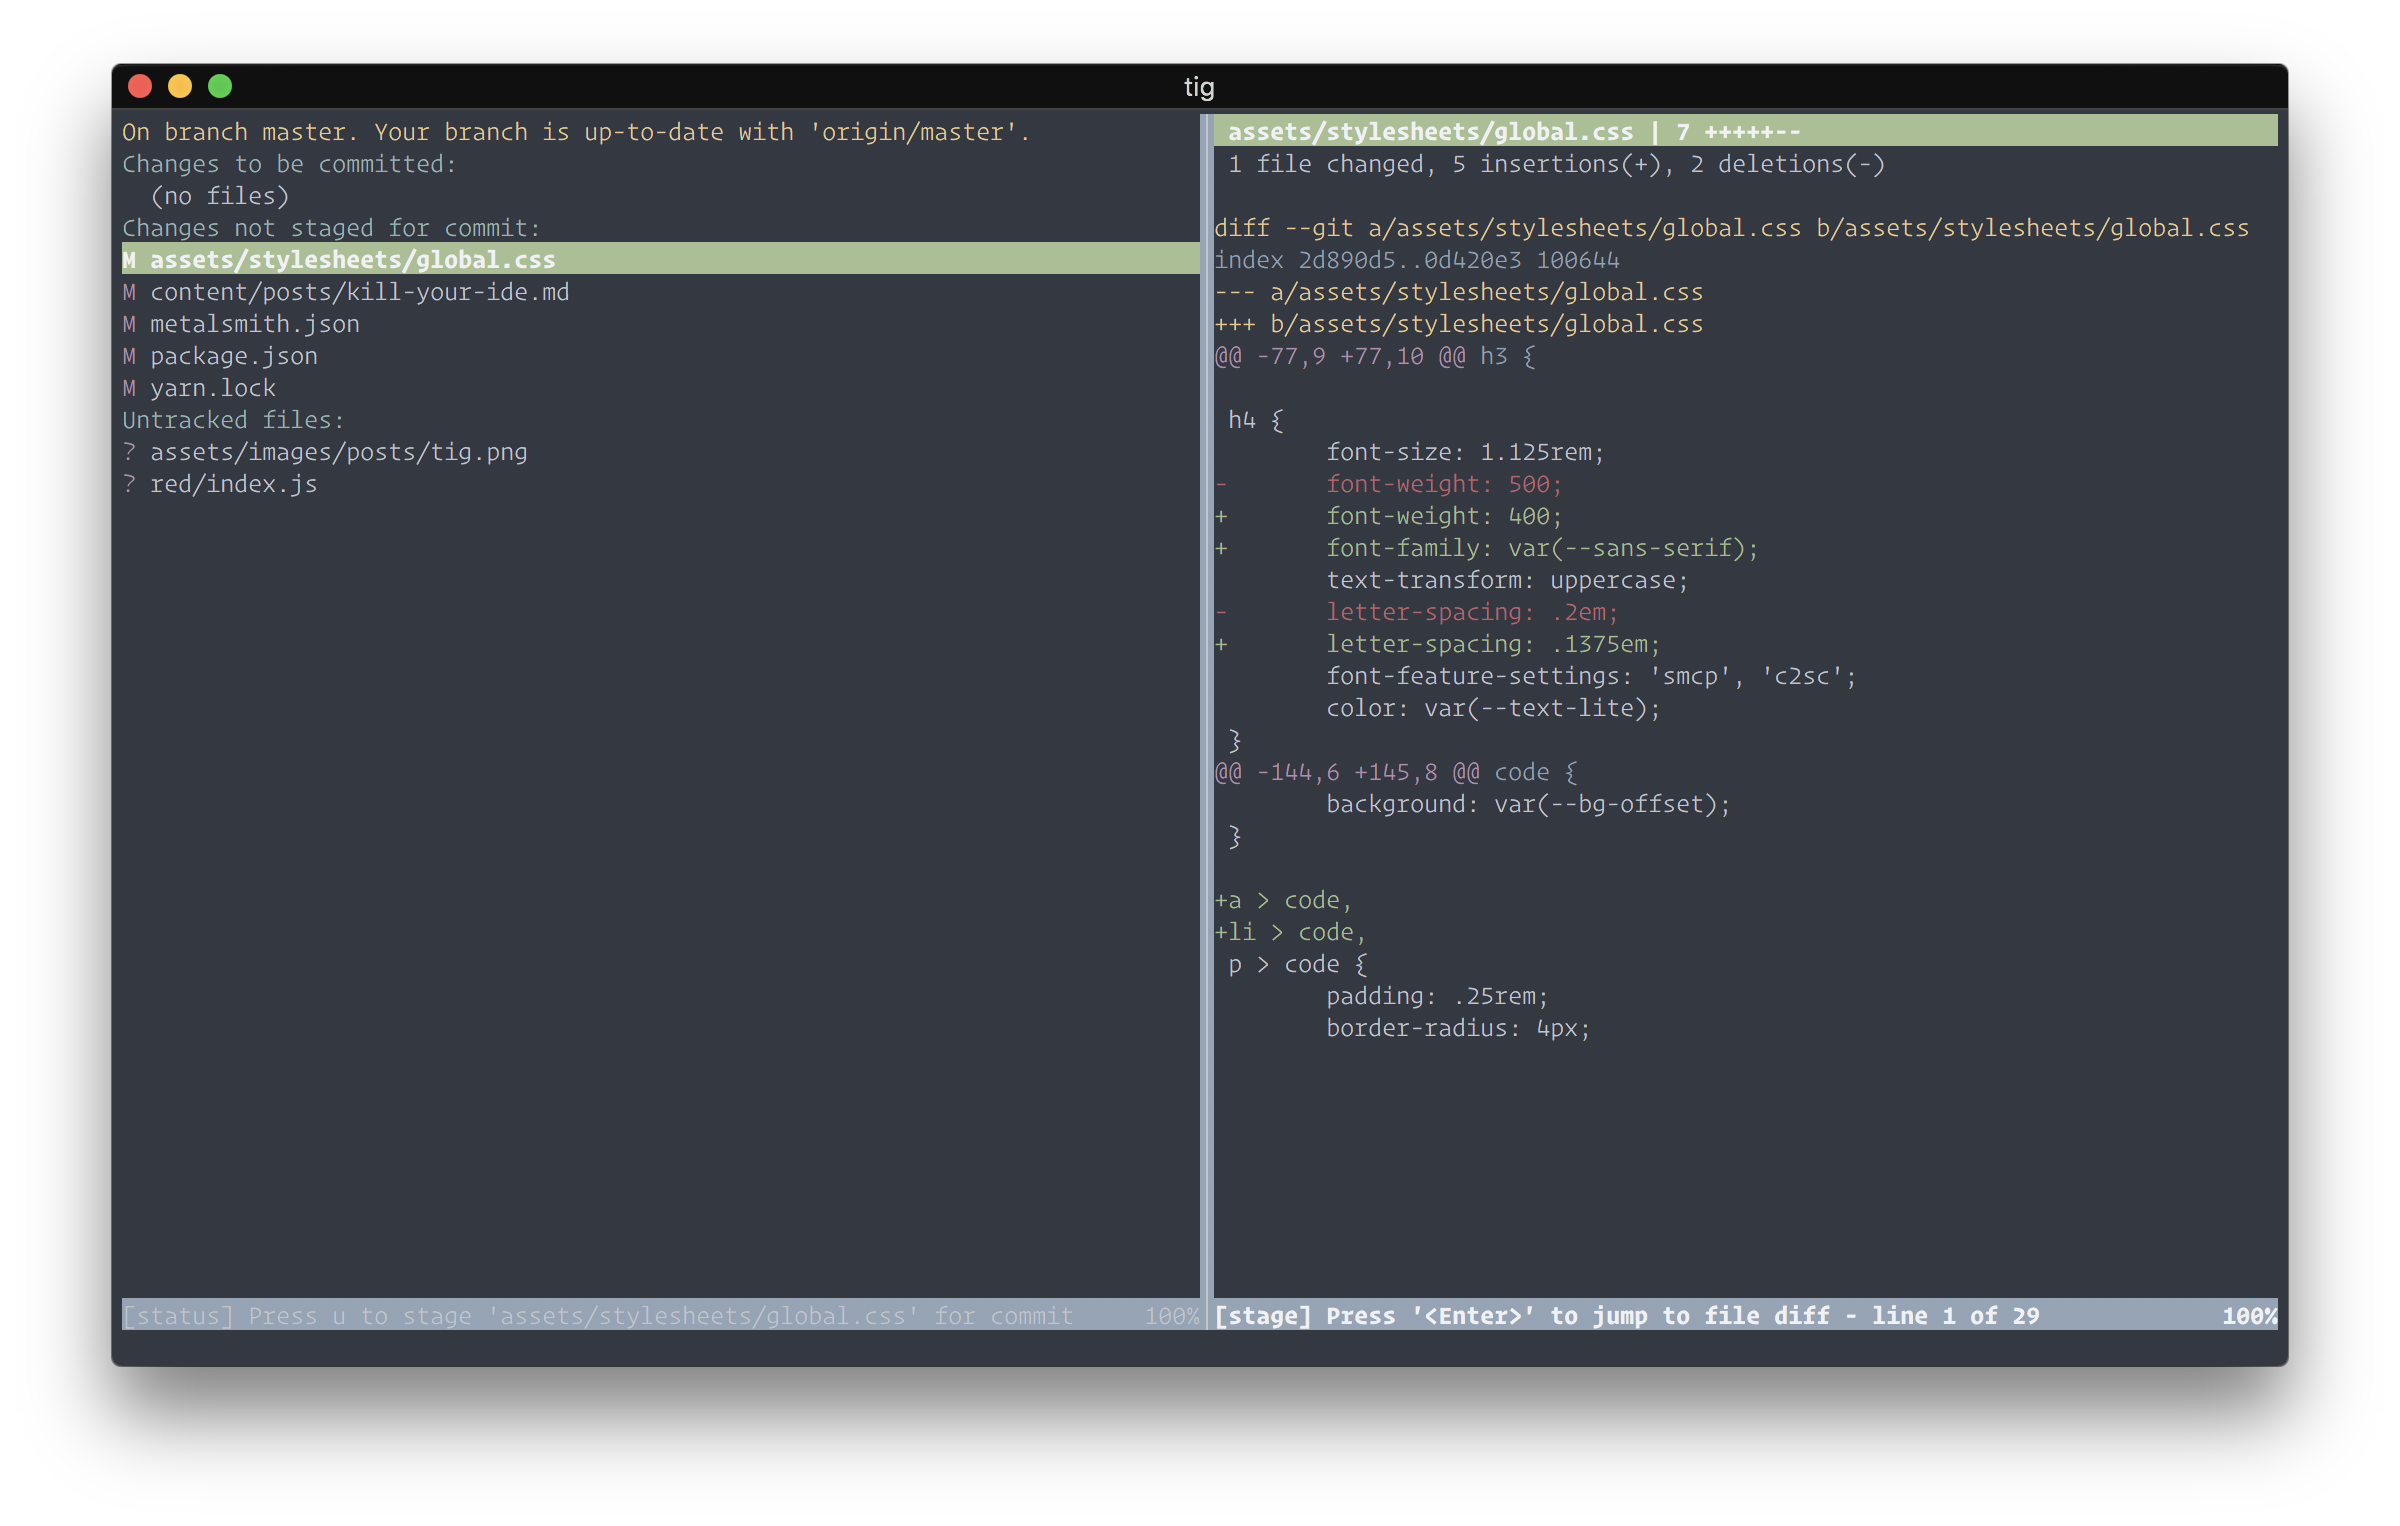
diff-so-fancy: whenever you run git diff you get a long list you have to scroll through and sometimes is hard to parse. diff-so-fancy is a really nice alternative that visually represents the diff in a human-readable way and supports vim key-bindings. Setting it up can be a little tedious, but gives you a good reason to play around with your global .gitconfig You can install this with Homebrew: brew install diff-so-fancy.

diff-so-fancy and on the right, a regular diffhub brings GitHub to your terminal. You log in through the terminal to GitHub and now you can create a repository on GitHub and add it as the repository’s remote in one command, or list that project’s issues on GitHub in your terminal, or neatly clone something without having the long SSH url on your clipboard. I won’t go into all the details of it but if you’re a power user of Git and GitHub, this tool saves so much time and effort. brew install hub
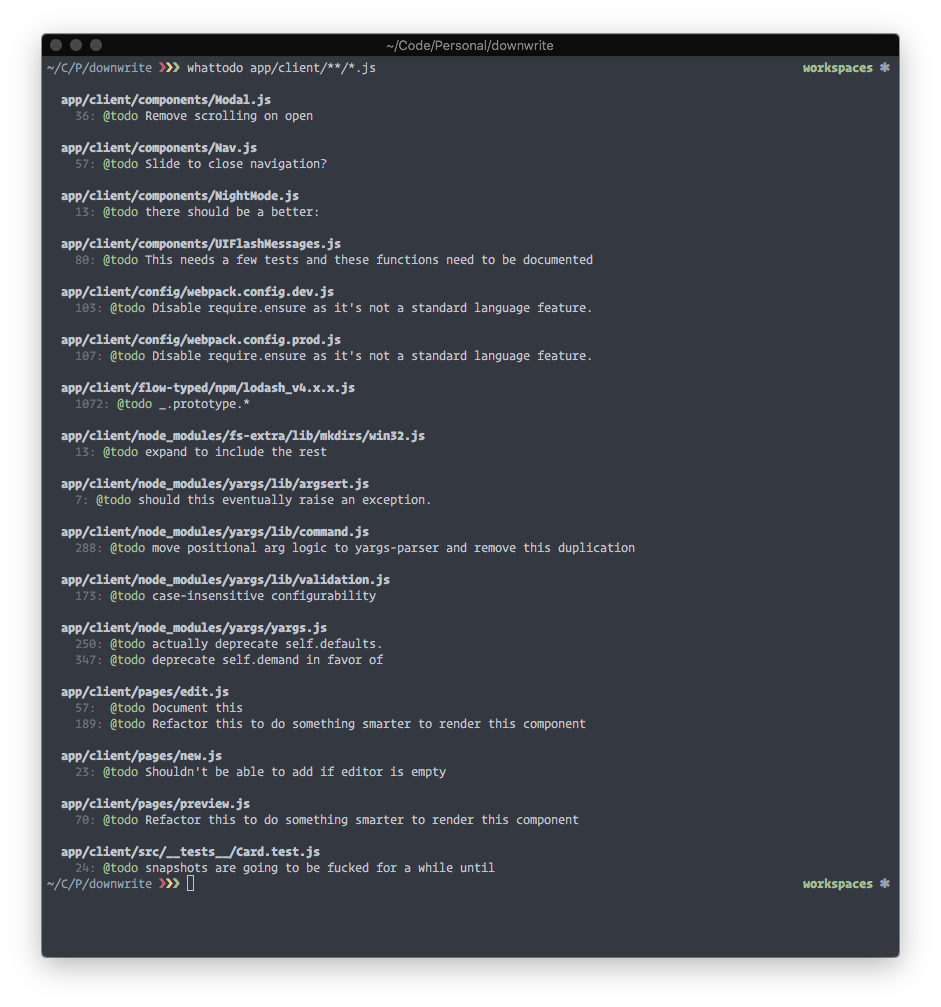
whattodo is less of a git tool and more of a project management tool. It scrapes through your project and lets you see all the project’s TODO comments throughout. I have not found a great tool for this in anything other than Atom, so finding one written in Node was so cool. yarn global add whattodo
Updating your Global Git Config
Several years ago I did not know you could override whatever git comes with out of the box. First thing I did was setting up an alias to remap git push -u origin HEAD to git push-this. Before that I thought you just had to alias everything through your shell with common aliases, but adding them in your .gitconfig makes them more elegant and live as commands you can pass to git instead of something like gpush and makes them available to prompt completion tools.
I use three aliases a lot:
git push-this:git push -u origin HEADwhich lets me push whatever branch I’m onto to the origin remote, meaning this will be know to your hosted git on GitHub or GitLab.git bb:!sh -c 'git rev-parse --abbrev-ref HEAD | pbcopy'prints the current branch and adds it to your system clipboard. I think this is dead useful, especially working on a team. “Hey Charles, Slack me that branch you’re working on!” — is one tiny command awaygit log-nice:git log --graph --oneline --all --decorateprints out a nice log that shows a visual history of branches and merges and commits.
Overriding your default .gitconfig can be super powerful. You do things like change the default commit message or change which editor you edit those commit messages in, like vim or here’s an example using Atom.
Last thing I wanted to touch on is automatically ignoring files on a machine. Whenever I start a new project or I want to mess around without pushing it up somewhere, I typically want a lot of things just ignored by default. Like on macOS there’s a random .DS_Store file that it generates, and I don’t want that in git history or my node_modules directory in that history either.
git config --global core.excludesfile ~/.gitignore_global

echo .DS_Store >> ~/.gitignore_global
That .gitignore_global works just like any other .gitignore and you add as much as you’d like to it. But if you’re going to push a project to a remote somewhere for someone else’s consumption you should remember to add a project level .gitignore too.
Also, if you you wanna recursively remove those .DS_Store files, this is a helpful command to alias:
find . -name ".DS_Store" -type f -deleteSystem Processes
Sometimes it’s helpful to touch system level processes on your machine from your terminal.
fkillsometimes a random process is running and you want to stop it.fkillgives you a fuzzy finding list of all the running process for you to select which one to end instead of runningpsto find the process name and runningkill $processvtop: there’s a nativetopthat’s just a list of all the running processes like a lesser version of macOS’s Activity Monitor and what vtop does is bring that UI into your terminal.trash/empty-trash: runningrm -rfis great but it’s a little risky, runningtrashlets you remove things and put in your system Trash and likewiseempty-trashempties your system Trash.lock: lets you lock your system instead of setting up a hot corner or selecting from the UI to set your system toSleepand automatically requires a password when you wake it.fast: it’s a nifty way to run Fast.com speed test inside your terminal. I find this particularly useful when I’m runningyarnand my connection is timing out on the train and I realize “oh, I’m on a train”.wifi-password: is a way to print your wifi-password to terminal. Seems like a thing you’d never use but I end up using it at least twice week.
yarn global add fkill-cli vtop trash-cli empty-trash-cli lock-cli fast-cliThere are lots of other modules out there that will give you lots and lots of granular control over your system from the terminal, like amending the your screen brightness or switching into dark mode. But I rarely use them or find them more helpful that the keyboard shortcuts on macOS.
Combining Workflows
Probably the best reason to work on the command line is that most of these commands can work with each other and are more of less Voltron but for your terminal.

Piping & Echoing
Using the pipe character can pass the output of a command into the next command to the right of the pipe:
git branch -l | fzfIn this example git branch -l outputs a long list of branches and | fzf pipes that output into an instance of fzf and makes that output searchable
Now let’s say you’re cargo culting your way through some answer to add a snippet into a config file. You can echo that into a file. pbpaste grabs from your system clipboard the > echoes it into that file
pbpaste >> .newfiletobecreated
pbpaste > .filethatexists
Alternatively you can pipe the output of a command into your system clipboard like this:
cat file.txt | pbcopyYou can do this with most commands and process that output something. No matter whether they’re running a shell script or a Node process.
Here’s a much more detail rich explanation of what’s going on with.
Using xargs
There’s another process called xargs that’s worth understanding. It’s similar to the piping concept but more powerful. I won’t lie, I barely understand what it is. But as I work more on the command line it’s something I keep asking: “is this something xargs can do for me?” and usually the answer is yes.
I have fzf aliased to do a basic search of files on my machine. When I select one, its output is the filename, or a list of them if I select a few. What this command below does is open each of them up in their own buffer in vim.
fzf | xargs -o vimJavaScript Workflows
As a UI engineer, most of my life is JavaScript and more productively using the terminal other than GUI tools. Naturally, I need to use a package manager quite a bit, to pull down libraries and tools to run tasks. Thankfully, the Node ecosystem has npm scripts so these two needs are part of the same workflow.
In 2016, Yarn was released as a package management tool. In my mind, it’s a replacement to the npm binary and a lovely drop-in replacement. One of the better features of Yarn was working offline; and the fact was on the roadmap early was so wonderful.
Adding lockfiles helps everyone touching the project get a deterministic dependency tree. Once you add something with Yarn it gets added to the cache which makes downloads faster and gives you offline access to packages you’ve downloaded before. As someone who takes the train an hour each way, this is seriously one of my favorite features.
One of the things I like about using Yarn is that it has very human experience. The CLI is filled with emoji and helpful error messages that are informative without being necessarily austere. There’s a wealth of naming schemes:
yarn add react # installs React and saves it as a dependency.
yarn dev # is the equivalent to running `npm run dev`
yarn global add mf-cli # installs MF globally on your system
yarn create react-app my-app # scaffold out a new react project
Using yarn create to scaffold projects is a dream. To use create-react-app or create-react-native-app all I need to is run: yarn create react-app myapp. It uses the latest version of create-react-app, it scaffolds the project with Yarn and I’m off to the races.
Using yarn upgrade-interactive in combination with yarn outdated is simple when you want to be a little more critical about dependencies you want to upgrade and it’s a massive improvement over what npm@4 offered to work through the same scenario. I used both just today to do a massive update to an older project with webpack, Babel and Jest, and the upgrading packages part took roughly 5 or 6 minutes. Also I ran yarn why several times for the first time today and it was more detailed than just running npm ls and searching for the dependency I’m looking for.
In fairness, npm has a lot of similar features and these tools work together. This is largely my preference.
Other Tools
As to other JavaScript tools I use:
- I legitimately don’t know who we wrote code before Prettier. Having a sharable sense of code style that communicates to every other developer on the team what is required.
- ESLint is a the code linter of JavaScript. I was very partial to JSCS but it merged with ESLint and all of the cooler tools like
create-react-apphave ESLint built into it. - Jest has a CLI experience that is way more clear and consumable than Mocha.
- Now is a phenomenal deployment and hosting tool that orchestrates everything to have so little configuration
Still Searching for
- Prettifying JSON output in a terminal; using
prettyjsonis pretty close I just want to be able to parse the output a little better. Might require a little more messing around on my part. - Replacing Slack with a IRC client. This is more of an unrealistic goal on my part, because I would still want to take advantage of system notifications in macos.
- A command to output all the results of
aginto individual vim buffers outside of vim. Basically I want to do a search and open each result in their own buffer or vertical split. - Toggling bluetooth from the terminal. This one looks great:
blueutil. Normally having mouses and keyboards plugged into different devices in disabled states or if bluetooth is off or on when I reopen a machine, navigating that is a real hassle (especially if you have your trackpad disabled while you have a bluetooth mouse connected). So using just the keyboard is 👍👍
A Note About Tmux
I like the idea of tmux but I’m having trouble getting the profile to work the way I’d like, especially with italics or Base16. But the tmux-resurrect and simple pane switch is too compelling not revisit this year.
Anyway, my whole point here is, simple tools should work for you. You shouldn’t have to be beholden to any tool that doesn’t make you productive or slows down your machine. Tools and workflows should interoperate with each other without a lot of friction.
Using a terminal versus GUI tools helped me really trim down my needs of what I’m doing with the code I’m working on and look more directly at the task I was doing. I keep finding that I compose with commands more than I’m trying to remember keyboard shortcuts or installing new plugins.
My next step here is to document how I’ve been using vim with FZF and vim-fugitive to be more productive than normal.